Bombom: Difference between revisions
No edit summary |
Tags: Mobile edit Mobile web edit |
||
| Line 8: | Line 8: | ||
==Strategy== | ==Strategy== | ||
Bombom is a high-damage Companion to a reckless degree, dealing fantastic {{Keyword|Barrage}} damage at a good speed but hurting their ''own'' row as well as the enemies'. This necessitates game awareness and a smaller field presence, as ideally Bombom's row is completely empty to avoid hurting allies or [[Clunkers]]. Their extremely high base {{Stat|health}} allows them to fit into an offensive or defensive role depending on what's needed, but it is not sustainable to do both at once without healing or {{Stat|Shell}}. Recalling them only recovers 5 health, enough for a single extra attack, and they still must be redrawn and redeployed, so healing and Shell are far preferable. This is especially important since Bombom can easily wipe out waves of regular enemies but will likely be very weak by the time minibosses show up in fights. | Bombom is a high-damage Companion to a reckless degree, dealing fantastic {{Keyword|Barrage}} damage at a good speed but hurting their ''own'' row as well as the enemies'. This necessitates game awareness and a smaller field presence, as ideally Bombom's row is completely empty to avoid hurting allies or [[Clunkers]]. This means that she has strong synergy with frog charm. Their extremely high base {{Stat|health}} allows them to fit into an offensive or defensive role depending on what's needed, but it is not sustainable to do both at once without healing or {{Stat|Shell}}. Recalling them only recovers 5 health, enough for a single extra attack, and they still must be redrawn and redeployed, so healing and Shell are far preferable. This is especially important since Bombom can easily wipe out waves of regular enemies but will likely be very weak by the time minibosses show up in fights. | ||
Bombom pairs extremely well with on-kill effects like {{Card|Shelly}}, the {{Charm|Pinch Charm}}, the {{Charm|Cloudberry Charm}}, and the {{Charm|Shield Charm}}. They can also work to sacrifice cards similarly to {{Card|Monch}}, although their self-inflicted damage still limits the effectiveness of this strategy (and they do not gain the killed allies' stats like Monch does). They also do not instantly kill the row like Monch does and instead inflict a fixed amount of damage, so {{Card|Fallow}}, {{Card|Chikasan}}, and {{Card|Chikashi}} will survive if they haven't lost any health. | Bombom pairs extremely well with on-kill effects like {{Card|Shelly}}, the {{Charm|Pinch Charm}}, the {{Charm|Cloudberry Charm}}, and the {{Charm|Shield Charm}}. They can also work to sacrifice cards similarly to {{Card|Monch}}, although their self-inflicted damage still limits the effectiveness of this strategy (and they do not gain the killed allies' stats like Monch does). They also do not instantly kill the row like Monch does and instead inflict a fixed amount of damage, so {{Card|Fallow}}, {{Card|Chikasan}}, and {{Card|Chikashi}} will survive if they haven't lost any health. | ||
Latest revision as of 14:20, 3 July 2024
| Bombom | |||
|---|---|---|---|
| 16 | 7 | 4 | |
| Other Stats | |||
| Card Description | |||
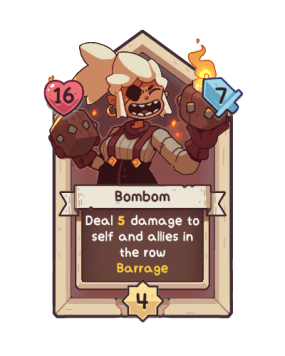
| Deal 5 damage to self and allies in the row Barrage | |||
|
| |||
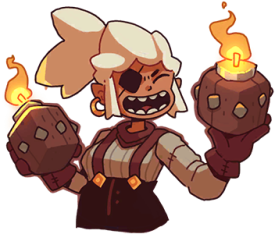
Bombom is a Companion that the player can bring along on a run.
Unlock
Deal 10 damage to your own team.
Strategy
Bombom is a high-damage Companion to a reckless degree, dealing fantastic Barrage damage at a good speed but hurting their own row as well as the enemies'. This necessitates game awareness and a smaller field presence, as ideally Bombom's row is completely empty to avoid hurting allies or Clunkers. This means that she has strong synergy with frog charm. Their extremely high base ![]() health allows them to fit into an offensive or defensive role depending on what's needed, but it is not sustainable to do both at once without healing or
health allows them to fit into an offensive or defensive role depending on what's needed, but it is not sustainable to do both at once without healing or ![]() Shell. Recalling them only recovers 5 health, enough for a single extra attack, and they still must be redrawn and redeployed, so healing and Shell are far preferable. This is especially important since Bombom can easily wipe out waves of regular enemies but will likely be very weak by the time minibosses show up in fights.
Shell. Recalling them only recovers 5 health, enough for a single extra attack, and they still must be redrawn and redeployed, so healing and Shell are far preferable. This is especially important since Bombom can easily wipe out waves of regular enemies but will likely be very weak by the time minibosses show up in fights.
Bombom pairs extremely well with on-kill effects like ![]() Shelly, the
Shelly, the ![]() Pinch Charm, the
Pinch Charm, the ![]() Cloudberry Charm, and the
Cloudberry Charm, and the ![]() Shield Charm. They can also work to sacrifice cards similarly to
Shield Charm. They can also work to sacrifice cards similarly to ![]() Monch, although their self-inflicted damage still limits the effectiveness of this strategy (and they do not gain the killed allies' stats like Monch does). They also do not instantly kill the row like Monch does and instead inflict a fixed amount of damage, so
Monch, although their self-inflicted damage still limits the effectiveness of this strategy (and they do not gain the killed allies' stats like Monch does). They also do not instantly kill the row like Monch does and instead inflict a fixed amount of damage, so ![]() Fallow,
Fallow, ![]() Chikasan, and
Chikasan, and ![]() Chikashi will survive if they haven't lost any health.
Chikashi will survive if they haven't lost any health.
Unlike ![]() Jumbo, Bombom's friendly fire does not count as a hit, so it will not interact with Smackback or
Jumbo, Bombom's friendly fire does not count as a hit, so it will not interact with Smackback or ![]() Teeth and will not inflict debuffs gained from Charms.
Teeth and will not inflict debuffs gained from Charms.
History
Other Languages
| Language | Official Name | Translation | Description |
|---|---|---|---|
| English | Bombom | — | Deal 5 damage to self and allies in the row Barrage |
| Chinese (Simplified) |
砰砰 Pēngpēng |
Bang Bang | 对自己和同排友军造成5点伤害 扫射 |
| Chinese (Traditional) |
砰砰 Pēngpēng |
Bang Bang | 對自己和同一排的隊友造成5點傷害 掃射 |
| Korean | 밤밤 Bambam |
Bambam | 자기 자신 및 같은 줄의 아군에게 5 피해 광역 |
| Japanese | ボムボム Bomubomu |
Bombom | 自分と味方1列に5ダメージを与える イチレツ |
| Cards | |
|---|---|
| Leaders | Snowdwellers Leaders • Shademancers Leaders • Clunkmasters Leaders |
| Pets | • • • • • • |
| Companions | • • • • • • • • • • • • • • • • • • • • • • • • • • • • • • • • • • • • • • • • • • • • • • • • • • • • • • • • |
| Shades | • • • • • • • • • • • • |
| Clunkers | • • • • • • • • • • • • • • • • • • • • • • • • • • • |
| Items | • • • • • • • • • • • • • • • • • • • • • • • • • • • • • • • • • • • • • • • • • • • • • • • • • • • • • • • • • • • • • • • • • • • • • • • • • • • • • • • • • |
| Enemies | • • • • • • • • • • • • • • • • • • • • • • • • • • • • • • • • • • • • • • • • • • • • • • • • • • • • • • • • • • • • • |
| Enemy Clunkers | • • • • • • • • |
| Minibosses | • • • • • • • • • • • • • • • • |
| Bosses | • • • • • • • • • • • • |

